
从 Netty4.2 源码中的 EchoServer 案例开始阅读,代码在 io.netty.example.echo.EchoServer
关键代码
ServerBootstrap.bind() - doBind() - initAndRegister() - init(channel) - p.addLast(new ChannelInitializer) - config().group().register(channel) - promise.channel().unsafe().register(this, promise) - doRegister() - ((IoEventLoop) eventLoop()).register((AbstractNioUnsafe) unsafe()) - register0() - pipeline.invokeHandlerAddedIfNeeded() - doBind0() - channel.bind(localAddress, promise) - pipeline.fireChannelActive() - readIfIsAutoRead()ServerBootstrap 启动流程
我们从 ServerBootstrap.doBind() 入口开始,在这一层主要干了两件事情
- initAndRegister() # 初始化 Channel 和注册 eventLoop
- doBind0() # 对 Channel 进行绑定端口
private ChannelFuture doBind(final SocketAddress localAddress) { // 异步初始化和注册 Channel final ChannelFuture regFuture = initAndRegister(); final Channel channel = regFuture.channel(); if (regFuture.cause() != null) { return regFuture; } // 确保 Channel 注册成功后执行 doBind0 方法对 Channel 进行绑定端口 if (regFuture.isDone()) { // At this point we know that the registration was complete and successful. ChannelPromise promise = channel.newPromise(); doBind0(regFuture, channel, localAddress, promise); return promise; } else { // Registration future is almost always fulfilled already, but just in case it's not. final PendingRegistrationPromise promise = new PendingRegistrationPromise(channel); regFuture.addListener(new ChannelFutureListener() { @Override public void operationComplete(ChannelFuture future) throws Exception { Throwable cause = future.cause(); if (cause != null) { // Registration on the EventLoop failed so fail the ChannelPromise directly to not cause an // IllegalStateException once we try to access the EventLoop of the Channel. promise.setFailure(cause); } else { // Registration was successful, so set the correct executor to use. // See https://github.com/netty/netty/issues/2586 promise.registered();
doBind0(regFuture, channel, localAddress, promise); } } }); return promise; }}initAndRegister()
正如其名,这个方法也干了两件事
- init(channel) # 初始化 Channel
- config().group().register(channel) # 用户配置的 EventLoop 关联到 Channel
final ChannelFuture initAndRegister() { Channel channel = null; try { channel = channelFactory.newChannel(); init(channel); } catch (Throwable t) { if (channel != null) { // channel can be null if newChannel crashed (eg SocketException("too many open files")) channel.unsafe().closeForcibly(); // as the Channel is not registered yet we need to force the usage of the GlobalEventExecutor return new DefaultChannelPromise(channel, GlobalEventExecutor.INSTANCE).setFailure(t); } // as the Channel is not registered yet we need to force the usage of the GlobalEventExecutor return new DefaultChannelPromise(new FailedChannel(), GlobalEventExecutor.INSTANCE).setFailure(t); }
// config().group() 用户配置的 bossGroup 的 eventLoop 关联到 channel final ChannelFuture regFuture = config().group().register(channel); if (regFuture.cause() != null) { if (channel.isRegistered()) { channel.close(); } else { channel.unsafe().closeForcibly(); } }
return regFuture;}init(channel) 方法给 Channel 设置了一些 option 和 attribute 属性,然后向 ChannelPipeline 添加了一个 ChannelInitializer 的 Handler
ChannelInitializer
一种特殊的 Handler,主要作用是初始化 Handler,ChannelInitializer 的 initChannel 方法执行完后会把自己从 ChannelPipeline 中移除
在这里 ChannelInitializer 的初始化主要做了两件事
- 向 ChannelPipeline 添加用户设置的 Handler
- 执行一个 EventLoop 异步任务,向 ChannelPipeline 添加 ServerBootstrapAcceptor(添加用户设置的 ChildHandler)
使用 EventLoop 执行异步任务是因为必须等 config().group().register(channel) 方法执行,EventLoop 初始化完成后才能执行
ServerBootstrapAcceptor
也是一种特殊的 Handler,当 server 接收到客户端的连接请求,通过 ServerBootstrapAcceptor,向 ChannelPipeline 添加用户设置的 ChildHandler
@Overridevoid init(Channel channel) { // 设置一些 option 和 attribute 属性 setChannelOptions(channel, newOptionsArray(), logger); setAttributes(channel, newAttributesArray());
ChannelPipeline p = channel.pipeline();
final EventLoopGroup currentChildGroup = childGroup; final ChannelHandler currentChildHandler = childHandler; final Entry<ChannelOption<?>, Object>[] currentChildOptions = newOptionsArray(childOptions); final Entry<AttributeKey<?>, Object>[] currentChildAttrs = newAttributesArray(childAttrs); final Collection<ChannelInitializerExtension> extensions = getInitializerExtensions(); // 添加 ChannelInitializer 初始化 Handler,在 EventLoop 执行时添加 ServerBootstrapAcceptor // ServerBootstrapAcceptor 用于服务端接收新连接然后添加 ChildHandler 的 Handler 前置处理 // 通过 PendingHandlerCallback 持有 AbstractChannelHandlerContext 对象进行懒加载(eventLoop 关联到 channel 后) p.addLast(new ChannelInitializer<Channel>() { @Override public void initChannel(final Channel ch) { final ChannelPipeline pipeline = ch.pipeline(); // 添加用户设置的 Handler ChannelHandler handler = config.handler(); if (handler != null) { pipeline.addLast(handler); } // EventLoop 执行任务时,异步添加 ServerBootstrapAcceptor ch.eventLoop().execute(new Runnable() { @Override public void run() { pipeline.addLast(new ServerBootstrapAcceptor( ch, currentChildGroup, currentChildHandler, currentChildOptions, currentChildAttrs, extensions)); } }); } }); // ...}config().group().register(channel) 方法作用是向用户配置的 EventLoopGroup 里的 EventLoop 关联 Channel 等注册逻辑,跟踪 register()方法
@Overridepublic ChannelFuture register(Channel channel) { // next() 是 SingleThreadEventLoop,所以 register() 方法都在 EventLoop 线程中执行 return next().register(channel);}
@Overridepublic ChannelFuture register(final ChannelPromise promise) { ObjectUtil.checkNotNull(promise, "promise"); promise.channel().unsafe().register(this, promise); return promise;}通过 SingleThreadEventLoop 线程调用 promise.channel().unsafe().register(this, promise),使用 Channel 里的 unsafe 进行注册
@Overridepublic final void register(EventLoop eventLoop, final ChannelPromise promise) { ObjectUtil.checkNotNull(eventLoop, "eventLoop"); if (isRegistered()) { promise.setFailure(new IllegalStateException("registered to an event loop already")); return; } if (!isCompatible(eventLoop)) { promise.setFailure( new IllegalStateException("incompatible event loop type: " + eventLoop.getClass().getName())); return; } // 关联 EventLoop 到 Channel AbstractChannel.this.eventLoop = eventLoop;
// Clear any cached executors from prior event loop registrations. AbstractChannelHandlerContext context = pipeline.tail; do { context.contextExecutor = null; context = context.prev; } while (context != null); // 必须在 eventLoop 线程中执行 register0 方法 // register0 关联(Selector 注册)、状态设置、事件触发、promise 等 if (eventLoop.inEventLoop()) { register0(promise); } else { try { eventLoop.execute(new Runnable() { @Override public void run() { register0(promise); } }); } catch (Throwable t) { logger.warn( "Force-closing a channel whose registration task was not accepted by an event loop: {}", AbstractChannel.this, t); closeForcibly(); closeFuture.setClosed(); safeSetFailure(promise, t); } }}这段代码很明显,register0(promise) 是注册的核心处理方法
private void register0(ChannelPromise promise) { // check if the channel is still open as it could be closed in the mean time when the register // call was outside of the eventLoop if (!promise.setUncancellable() || !ensureOpen(promise)) { return; } ChannelPromise registerPromise = newPromise(); boolean firstRegistration = neverRegistered; // doRegister 注册完成后执行,向 ChannelPipeline 添加 Handler registerPromise.addListener(new ChannelFutureListener() { @Override public void operationComplete(ChannelFuture future) throws Exception { if (future.isSuccess()) { neverRegistered = false; registered = true; // Ensure we call handlerAdded(...) before we actually notify the promise. This is needed as the // user may already fire events through the pipeline in the ChannelFutureListener. // 执行 ChannelInitializer 的 config.handler() 添加用户配置的 handler,最后删除当前 ChannelInitializer pipeline.invokeHandlerAddedIfNeeded(); // 设置状态,通知 promise 的 Listener safeSetSuccess(promise); // 递归调用 ChannelHandlerContext 所有的 channelRegistered 方法(事件传递) pipeline.fireChannelRegistered(); // Only fire a channelActive if the channel has never been registered. This prevents firing // multiple channel actives if the channel is deregistered and re-registered. if (isActive()) { if (firstRegistration) { pipeline.fireChannelActive(); } else if (config().isAutoRead()) { // This channel was registered before and autoRead() is set. This means we need to // begin read again so that we process inbound data. // // See https://github.com/netty/netty/issues/4805 beginRead(); } } } else { // Close the channel directly to avoid FD leak. closeForcibly(); closeFuture.setClosed(); safeSetFailure(promise, future.cause()); } } }); // Channel 关联到 selector,关联各种组件 doRegister(registerPromise);}在以往的 Netty 版本源码中,是先调用 doRegister() 方法,然后再往 ChannelPipeline 添加 Handler
Netty4.2 把添加 Handler 的逻辑重构成回调的形式,放到 registerPromise 的 Listener 中,在 doRegister(registerPromise) 执行完成后再回调执行,所以我们先看 doRegister() 方法做了什么
doRegister()
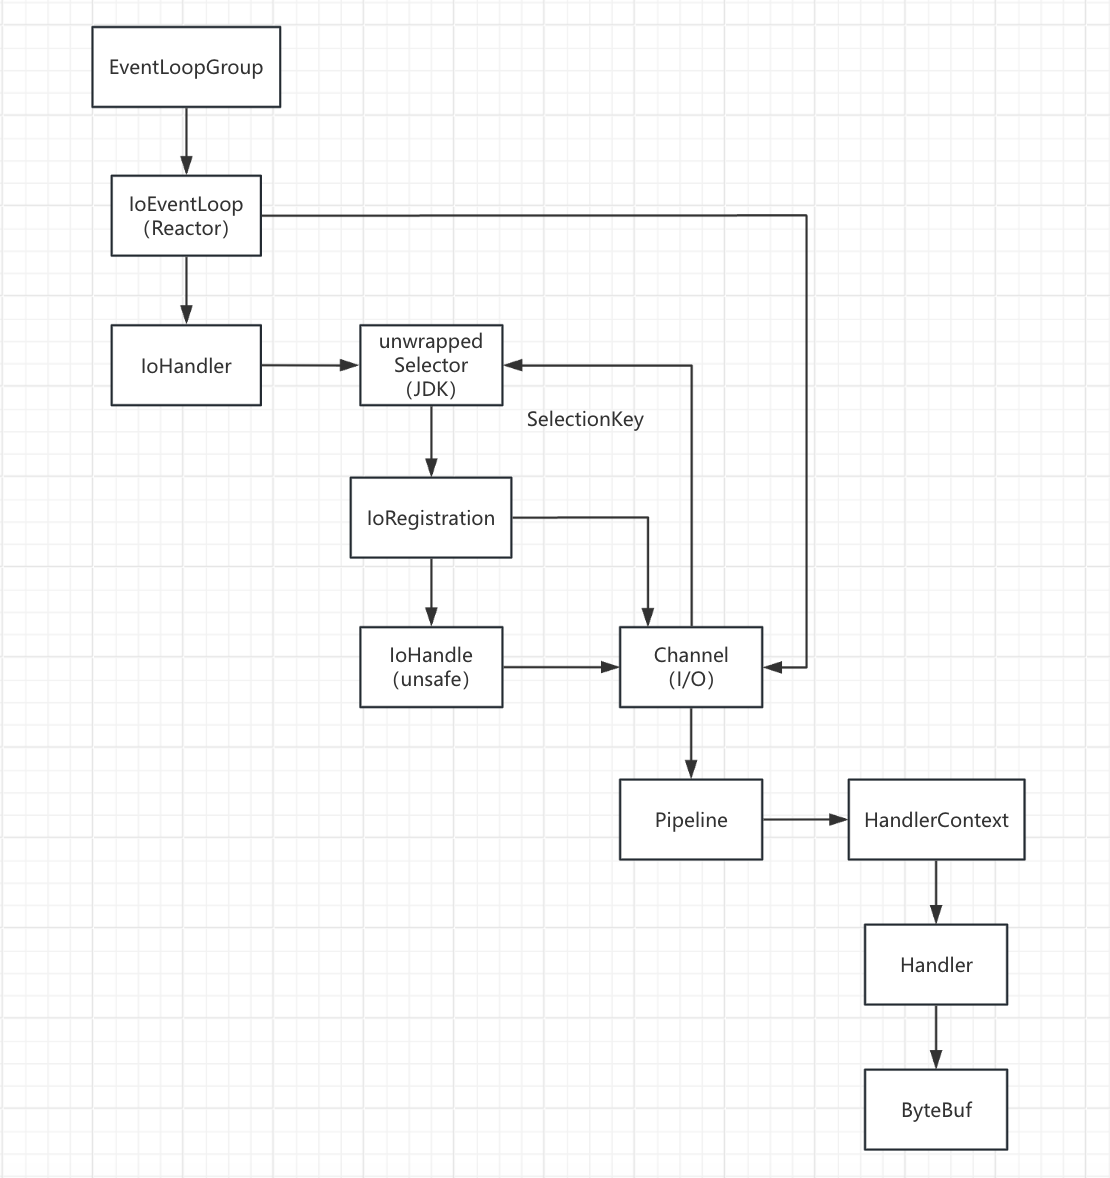
@SuppressWarnings("unchecked")@Overrideprotected void doRegister(ChannelPromise promise) { assert registration == null; // IoHandle 是 (AbstractNioUnsafe) unsafe() // IoHandle 获取 Channel 关联到 selector 返回 SelectionKey // 通过 IoRegistration 关联 IoHandle 和 SelectionKey,返回 IoRegistration 对象 ((IoEventLoop) eventLoop()).register((AbstractNioUnsafe) unsafe()).addListener(f -> { if (f.isSuccess()) { // Channel 在回调中关联 IoRegistration registration = (IoRegistration) f.getNow(); // 设置 registerPromise 状态,通知监听器 promise.setSuccess(); } else { promise.setFailure(f.cause()); } });}这一段代码是 Netty4.2 中主要 重构的部分,涉及 IoEventLoop、IoHandler、IoHandle、IoRegistration 等核心组件的关联关系
继续深入跟踪 IoEventLoop.register() 方法,调用链有点长
@Overridepublic final Future<IoRegistration> register(final IoHandle handle) { Promise<IoRegistration> promise = newPromise(); if (inEventLoop()) { registerForIo0(handle, promise); } else { execute(() -> registerForIo0(handle, promise)); }
return promise;}
private void registerForIo0(final IoHandle handle, Promise<IoRegistration> promise) { assert inEventLoop(); final IoRegistration registration; try { // 通过 ioHandler 返回 IoRegistration registration = ioHandler.register(handle); } catch (Exception e) { promise.setFailure(e); return; } numRegistrations.incrementAndGet(); // 设置 promise 状态,回调里返回 IoRegistration promise.setSuccess(new IoRegistrationWrapper(registration));}
@Overridepublic IoRegistration register(IoHandle handle) throws Exception { NioIoHandle nioHandle = nioHandle(handle); NioIoOps ops = NioIoOps.NONE; boolean selected = false; for (;;) { try { // 创建 IORegistration return new DefaultNioRegistration(executor, nioHandle, ops, unwrappedSelector()); } catch (CancelledKeyException e) { if (!selected) { // Force the Selector to select now as the "canceled" SelectionKey may still be // cached and not removed because no Select.select(..) operation was called yet. selectNow(); selected = true; } else { // We forced a select operation on the selector before but the SelectionKey is still cached // for whatever reason. JDK bug ? throw e; } } }}
final class DefaultNioRegistration implements IoRegistration { private final NioIoHandle handle; private volatile SelectionKey key;
DefaultNioRegistration(ThreadAwareExecutor executor, NioIoHandle handle, NioIoOps initialOps, Selector selector) throws IOException { this.handle = handle; // IoHandle 获取 channel 关联到 selector,返回 SelectionKey // 注意最后一个参数 this,把自己当参数传进去 key = handle.selectableChannel().register(selector, initialOps.value, this); }}
public final SelectionKey register(Selector sel, int ops, Object att) throws ClosedChannelException{ if ((ops & ~validOps()) != 0) throw new IllegalArgumentException(); if (!isOpen()) throw new ClosedChannelException(); synchronized (regLock) { if (isBlocking()) throw new IllegalBlockingModeException(); synchronized (keyLock) { // re-check if channel has been closed if (!isOpen()) throw new ClosedChannelException(); // 判断是否重复注册 SelectionKey k = findKey(sel); if (k != null) { k.attach(att); k.interestOps(ops); } else { // New registration // 向 selector 注册操作数,返回一个 key // att 是 IoRegistration,会绑定到 key 的 attach 里 k = ((AbstractSelector)sel).register(this, ops, att); // 把 key 添加到 Channel 的 SelectionKey[] 中 addKey(k); } return k; } }}DefaultNioRegistration 的构造函数中,关联了 IoHandle,并且通过 IoHandle 获取 Channel 调用 它的 register() 方法向 JDK 的 selector 注册一个操作数,返回 SelectionKey 到 DefaultNioRegistration 的成员变量中
最终在 doRegister() 的 ((IoEventLoop) eventLoop()).register((AbstractNioUnsafe) unsafe()).addListener 回调中,把 Channel 和 IoRegistration 进行关联
unsafe
是 Channel 的内部接口,在具体的 Channel 中实现执行真正的 I/O 读写、连接、注册等底层操作,正如其名一般不暴露给用户
所以 Channel 和 selector 的关系,是通过互相持有 selector 的 key 进行绑定的,但 Netty4.2 中 通过 IoRegistration 间接持有 selector 的 key 进行了解耦
((IoEventLoop) eventLoop()).register((AbstractNioUnsafe) unsafe()).addListener(f -> { if (f.isSuccess()) { // Channel 在回调中关联 IoRegistration registration = (IoRegistration) f.getNow(); // 设置 registerPromise 状态,通知 Listener promise.setSuccess(); } else { promise.setFailure(f.cause()); }});然后设置 registerPromise 的状态通知 Listener 执行,回到前面 register0() 方法,跟踪一下 Listener 里添加 Handler 的逻辑
registerPromise
registerPromise.addListener(new ChannelFutureListener() { @Override public void operationComplete(ChannelFuture future) throws Exception { // ...
// Ensure we call handlerAdded(...) before we actually notify the promise. This is needed as the // user may already fire events through the pipeline in the ChannelFutureListener. // 执行 ChannelInitializer 的 config.handler() 添加用户配置的 handler,最后删除当前 ChannelInitializer pipeline.invokeHandlerAddedIfNeeded(); // 设置状态,通知 promise 的 Listener safeSetSuccess(promise); // 递归调用 ChannelHandlerContext 所有的 channelRegistered 方法(事件传递) pipeline.fireChannelRegistered(); // ... }});先看 pipeline.invokeHandlerAddedIfNeeded() 方法
这个方法就是向 pipeline 添加 Handler,调用链比较长,我们只看核心的处理方法,重点关注 handlerAdded() 方法,因为 ChannelInitializer 是第一个 Handler,所以执行的是 ChannelInitializer 的 handlerAdded() 方法
- pipeline.invokeHandlerAddedIfNeeded()
- callHandlerAddedForAllHandlers()
- task.execute()
- callHandlerAdded0(ctx)
- ctx.callHandlerAdded()
- handler().handlerAdded(this)
- ctx.callHandlerAdded()
- callHandlerAdded0(ctx)
- task.execute()
- callHandlerAddedForAllHandlers()
@Overridepublic void handlerAdded(ChannelHandlerContext ctx) throws Exception { if (ctx.channel().isRegistered()) { // This should always be true with our current DefaultChannelPipeline implementation. // The good thing about calling initChannel(...) in handlerAdded(...) is that there will be no ordering // surprises if a ChannelInitializer will add another ChannelInitializer. This is as all handlers // will be added in the expected order. if (initChannel(ctx)) { // We are done with init the Channel, removing the initializer now. // 源码注解已经说明,初始化后,移除 ChannelInitializer // 这里移除的是 ChannelInitializer 里 initMap 的 ctx removeState(ctx); } }}
@SuppressWarnings("unchecked")private boolean initChannel(ChannelHandlerContext ctx) throws Exception { if (initMap.add(ctx)) { // Guard against re-entrance. try { // 执行 ChannelInitializer 的 initChannel 方法 initChannel((C) ctx.channel()); } catch (Throwable cause) { // Explicitly call exceptionCaught(...) as we removed the handler before calling initChannel(...). // We do so to prevent multiple calls to initChannel(...). exceptionCaught(ctx, cause); } finally { if (!ctx.isRemoved()) { // 移除当前 ChannelInitializer ctx.pipeline().remove(this); } } return true; } return false;}可以看到 initChannel() 方法执行完,会把 ChannelInitializer 从 ChannelPipeline 中移除,我们回顾一下 initChannel() 方法里做了什么
- 向 ChannelPipeline 添加用户设置的 Handler
- 执行一个 EventLoop 异步任务,向 ChannelPipeline 添加 ServerBootstrapAcceptor(添加用户设置的 ChildHandler)
继续往下看 pipeline.fireChannelRegistered() 方法,这个方法作用是通过 HeadContext 从头到尾递归 HandlerContext 传递 register 入站事件,显然是通过责任链模式实现的,这种通知算是支线,就不详细跟踪了
到此 ChannelPipeline 里 Handler 的初始化完成
在 doBind0() 方法中,绑定完端口后会调用另一个 fireChannelActive() 方法传递 active 入站事件,它们代码差别不大
doBind0()
这个方法只做了一件事:对 Channel 进行绑定端口
通过 eventLoop 线程异步执行 bind() 方法,我们一路跟踪它
private static void doBind0( final ChannelFuture regFuture, final Channel channel, final SocketAddress localAddress, final ChannelPromise promise) {
// This method is invoked before channelRegistered() is triggered. Give user handlers a chance to set up // the pipeline in its channelRegistered() implementation. channel.eventLoop().execute(new Runnable() { @Override public void run() { if (regFuture.isSuccess()) { channel.bind(localAddress, promise).addListener(ChannelFutureListener.CLOSE_ON_FAILURE); } else { promise.setFailure(regFuture.cause()); } } });}
@Overridedefault ChannelFuture bind(SocketAddress localAddress, ChannelPromise promise) { return pipeline().bind(localAddress, promise);}
@Overridepublic final ChannelFuture bind(SocketAddress localAddress, ChannelPromise promise) { // 通过 TailContext 调用 bind 方法 return tail.bind(localAddress, promise);}
@Overridepublic ChannelFuture bind(final SocketAddress localAddress, final ChannelPromise promise) { ObjectUtil.checkNotNull(localAddress, "localAddress"); if (isNotValidPromise(promise, false)) { // cancelled return promise; } // MASK 用来标识某个 ChannelHandler 是否实现了某类,找到实现了 bind 方法的 HandlerContext final AbstractChannelHandlerContext next = findContextOutbound(MASK_BIND); EventExecutor executor = next.executor(); if (executor.inEventLoop()) { // 递归执行 HandlerContext 的 bind 方法(事件传递) next.invokeBind(localAddress, promise); } else { safeExecute(executor, new Runnable() { @Override public void run() { next.invokeBind(localAddress, promise); } }, promise, null, false); } return promise;}我们发现 bind() 方法是先通过 TailContext 调用,然后再通过 findContextOutbound(MASK_BIND) 方法获取下一个实现了 bind() 方法的 Handler 的 HandlerContext,调用 invokeBind() 方法传递 bind 出站事件
观察 findContextOutbound() 方法,它的函数名是 out 代表出站方向,从 TailContext 往前找 HandlerContext
Extend也存在 findContextInbound() 方法,in 代表入站方向,从 HeadContext 往后找 HandlerContext
在之前的 pipeline.fireChannelRegistered() 方法,传递 register 入站事件中有使用到
private AbstractChannelHandlerContext findContextOutbound(int mask) { AbstractChannelHandlerContext ctx = this; EventExecutor currentExecutor = executor(); do { // 往前找 ctx = ctx.prev; // 通过 mask 掩码和 MASK_ONLY_OUTBOUND 集合掩码筛选符合的 HandlerContext } while (skipContext(ctx, currentExecutor, mask, MASK_ONLY_OUTBOUND)); return ctx;}这里的 mask 是使用二进制标记出入站的事件类型掩码,通过位运算筛选事件
ChannelHandlerMask
final class ChannelHandlerMask { // Using to mask which methods must be called for a ChannelHandler. static final int MASK_EXCEPTION_CAUGHT = 1; static final int MASK_CHANNEL_REGISTERED = 1 << 1; static final int MASK_CHANNEL_UNREGISTERED = 1 << 2; static final int MASK_CHANNEL_ACTIVE = 1 << 3; static final int MASK_CHANNEL_INACTIVE = 1 << 4; static final int MASK_CHANNEL_READ = 1 << 5; static final int MASK_CHANNEL_READ_COMPLETE = 1 << 6; static final int MASK_USER_EVENT_TRIGGERED = 1 << 7; static final int MASK_CHANNEL_WRITABILITY_CHANGED = 1 << 8; static final int MASK_BIND = 1 << 9; static final int MASK_CONNECT = 1 << 10; static final int MASK_DISCONNECT = 1 << 11; static final int MASK_CLOSE = 1 << 12; static final int MASK_DEREGISTER = 1 << 13; static final int MASK_READ = 1 << 14; static final int MASK_WRITE = 1 << 15; static final int MASK_FLUSH = 1 << 16;
// 事件集合 static final int MASK_ONLY_INBOUND = MASK_CHANNEL_REGISTERED | MASK_CHANNEL_UNREGISTERED | MASK_CHANNEL_ACTIVE | MASK_CHANNEL_INACTIVE | MASK_CHANNEL_READ | MASK_CHANNEL_READ_COMPLETE | MASK_USER_EVENT_TRIGGERED | MASK_CHANNEL_WRITABILITY_CHANGED; private static final int MASK_ALL_INBOUND = MASK_EXCEPTION_CAUGHT | MASK_ONLY_INBOUND; static final int MASK_ONLY_OUTBOUND = MASK_BIND | MASK_CONNECT | MASK_DISCONNECT | MASK_CLOSE | MASK_DEREGISTER | MASK_READ | MASK_WRITE | MASK_FLUSH; private static final int MASK_ALL_OUTBOUND = MASK_EXCEPTION_CAUGHT | MASK_ONLY_OUTBOUND;}
private static boolean skipContext( AbstractChannelHandlerContext ctx, EventExecutor currentExecutor, int mask, int onlyMask) { // Ensure we correctly handle MASK_EXCEPTION_CAUGHT which is not included in the MASK_EXCEPTION_CAUGHT // 通过位运算,筛选实现了某个事件方法的 HandlerContext return (ctx.executionMask & (onlyMask | mask)) == 0 || // We can only skip if the EventExecutor is the same as otherwise we need to ensure we offload // everything to preserve ordering. // // See https://github.com/netty/netty/issues/10067 (ctx.executor() == currentExecutor && (ctx.executionMask & mask) == 0);}使用位运算效率高,一个 int 整数可以表示 32 个事件,原理不难,我们可以学习一下这种优化方式
MASK_A = 1 = 0000 0001MASK_B = 1 << 1 = 0000 0010MASK_C = 1 << 2 = 0000 0100
| 运算可以合并事件
表示 A 事件和 B 事件的集合 MASK_AB = MASK_A | MASK_B = 0000 0011
& 运算可以过滤事件
表示 A 事件在 AB 事件集合中 MASK_A & MASK_AB = 0000 0001
表示 C 事件不在 AB 事件集合中 MASK_C & MASK_AB = 0000 0000invokeBind()
找到实现了 bind() 方法的 Handler 的 HandlerContext 后,调用 invokeBind() 方法,我们看一下它的实现细节,很经典的责任链模式,调用 Handler 的 bind() 方法,实际上会通过 HandlerContext 调用 bind() 方法进行递归
private void invokeBind(SocketAddress localAddress, ChannelPromise promise) { // invokeHandler() 防止 handler 还没添加完成,就开始接收事件 if (invokeHandler()) { try { // DON'T CHANGE // Duplex handlers implements both out/in interfaces causing a scalability issue // see https://bugs.openjdk.org/browse/JDK-8180450 final ChannelHandler handler = handler(); // 获取第一个 HandlerContext final DefaultChannelPipeline.HeadContext headContext = pipeline.head; if (handler == headContext) { // 因为第一个 HandlerContext 是 netty 定义的,由它执行 unsafe.bind 比较安全 // 第一个 HandlerContext 执行 bind 对端口进行绑定 headContext.bind(this, localAddress, promise); } else if (handler instanceof ChannelDuplexHandler) { // 递归调用 bind 方法,继续找前一个 HandlerContext ((ChannelDuplexHandler) handler).bind(this, localAddress, promise); } else if (handler instanceof ChannelOutboundHandlerAdapter) { ((ChannelOutboundHandlerAdapter) handler).bind(this, localAddress, promise); } else { ((ChannelOutboundHandler) handler).bind(this, localAddress, promise); } } catch (Throwable t) { notifyOutboundHandlerException(t, promise); } } else { bind(localAddress, promise); }}递归出口是找到第一个 HeadContext,因为第一个 HandlerContext 是 Netty 定义的,由它执行 unsafe.bind() 对端口执行绑定比较安全(unsafe 一般不暴露给用户)
可能读者会纳闷,为什么不从一开始就通过第一个 HeadContext 执行 bind() 方法?
- 因为要传递 bind 出站事件,通知所有的 Handler,例如 LoggingHandler,记录事件日志
绑定的逻辑不多了,我们大概过一下
@Overridepublic void bind( ChannelHandlerContext ctx, SocketAddress localAddress, ChannelPromise promise) { unsafe.bind(localAddress, promise);}
@Overridepublic final void bind(final SocketAddress localAddress, final ChannelPromise promise) { // ... boolean wasActive = isActive(); try { doBind(localAddress); } catch (Throwable t) { safeSetFailure(promise, t); closeIfClosed(); return; }
if (!wasActive && isActive()) { // 递归执行 fireChannelActive 方法,激活 Channel 事件 invokeLater(new Runnable() { @Override public void run() { pipeline.fireChannelActive(); } }); }
safeSetSuccess(promise);}
@Overrideprotected void doBind(SocketAddress localAddress) throws Exception { javaChannel().bind(localAddress, config.getBacklog());}
@Overridepublic ServerSocketChannel bind(SocketAddress local, int backlog) throws IOException { synchronized (stateLock) { ensureOpen(); if (localAddress != null) throw new AlreadyBoundException(); // 根据操作系统,选择调用 if (isUnixSocket()) { localAddress = unixBind(local, backlog); } else { localAddress = netBind(local, backlog); } } return this;}最后根据操作系统,选择调用 unixBind() 或者 netBind(),后面的逻辑就不看了,执行完绑定后,会调用 pipeline.fireChannelActive() 方法,传递 active 入站事件
readIfIsAutoRead()
在这个 active 事件中,先通过第一个 HeadContext 调用 channelActive() 方法,然后在方法中递归调用 fireChannelActive() 方法传递 active 事件,最后调用 readIfIsAutoRead() 开启 Channel 的 read 事件
@Overridepublic final ChannelPipeline fireChannelActive() { if (head.executor().inEventLoop()) { if (head.invokeHandler()) { head.channelActive(head); } else { head.fireChannelActive(); } } else { head.executor().execute(this::fireChannelActive); } return this;}
@Overridepublic void channelActive(ChannelHandlerContext ctx) { // 递归调用 fireChannelActive() ctx.fireChannelActive(); // Channel 上开启读事件(OP_ACCEPT)的监听 readIfIsAutoRead();}fireChannelActive() 的事件传递就不展开说了,重点关注 readIfIsAutoRead() 方法,它开启了一个 read 出站事件,又开始一轮事件传递的递归调用,事件传递的代码都差不多,可以省略
- readIfIsAutoRead()
- channel.read()
- pipeline.read()
- tail.read() # 从尾到头传递 read 事件
- unsafe.beginRead() # 直到 HeadContext 的 read() 方法执行它
- AbstractNioChannel.doBeginRead()
- unsafe.beginRead() # 直到 HeadContext 的 read() 方法执行它
- tail.read() # 从尾到头传递 read 事件
- pipeline.read()
- channel.read()
@Overrideprotected void doBeginRead() throws Exception { // Channel.read() or ChannelHandlerContext.read() was called IoRegistration registration = this.registration; if (registration == null || !registration.isValid()) { return; } // 设置 readPending readPending = true; // 注册 OP_ACCEPT 监听事件 addAndSubmit(readOps);}
protected void addAndSubmit(NioIoOps addOps) { // 获取当前 selector 注册的事件 int interestOps = selectionKey().interestOps(); // 如果没有当前的事件,注册该事件 if (!addOps.isIncludedIn(interestOps)) { try { registration().submit(NioIoOps.valueOf(interestOps).with(addOps)); } catch (Exception e) { throw new ChannelException(e); } }}最后通过 IoRegistration 向 selector 注册 OP_ACCEPT 监听事件
到此,ServerBootstrap 的启动流程完成
总结
- Handler 初始化
- 通过
ChannelInitializer添加用户设置的 Handler,执行完后把它从 ChannelPipeline 中移除 - 当 server 接收到客户端的连接请求,通过
ServerBootstrapAcceptor,向 ChannelPipeline 添加用户设置的 ChildHandler
- 通过
- Netty 事件传递机制(责任链模式 + 二进制掩码过滤)
- 入站:从 HeadContext 递归遍历到 TailContext,调用对应事件方法
- 出站:从 TailContext 递归遍历到 HeadContext,调用对应事件方法
- 事件通知
- register 入站事件在
ChannelInitializer执行完初始化后通知 - bind 出站事件在 bind 方法执行过程中通知
- active 入站事件在 bind 方法执行完成后通知
- read 出站事件在 active 事件通知完后,再开启通知
- register 入站事件在
- 核心组件的关联关系,一图流